前言:
由于经常使用微信登录其他一些博客论坛什么的,就会经常遇到扫一扫登录的情况,大家都知道,我们平时访问的网页一般都是无连接的,也就是说需要数据的时候即便发出请求,服务器接受到请求之后便处理并返回相应的数据,这时连接就已经断开了,而使用扫一扫登陆的情况确是相反的,页面中的二维码一直等待着我们使用手机去扫描它,扫描过后页面完成登陆操作并进行一些跳转,那么问题来了,这是怎么实现的呢?怀着好奇心,先激活出二维码界面,再在浏览器上按下F12,切换到控制台,发现每隔几秒便有一个请求发出,稍微想想也就知道大致是怎么回事了,不就是长轮询嘛,实现的方法也挺多的,可以使用最原始的XMLHttpRequest,也可以使用WebSocket。最近也闲来没事做,就打算自己写个demo好了。
一、架构介绍
既然是demo,我们也没必要搞太复杂,就用客户端A、服务器B、服务器C、客户端D表示吧。
客户端A模拟触发登录操作,服务器B接收到A的请求,B再告知服务器C要进行操作了,C接收到指令后通过服务器推送告诉客户端D显示确认或取消登录的按钮,当用户点击按钮后,D再向C发送一条请求,告知其用户的操作结果,再从C到B,B到A的顺序一步步返回。在C、D进行通信时,A、B发起的请求处于挂起(等待)状态,如果超时的话,就重新进行链接。
二、技术栈介绍
服务器用到了node+koa,客户端仅仅使用了Html和js,客户端向服务器发送请求使用了XMLHttpRequest,服务器间通信使用request-promise模块,服务器向客户端推送数据使用EventSource,此demo没有使用WebSocket纯粹是因为从来没有用过EventSource想练练手,谁想踩了大坑,后文分解。
三、代码讲解
又到了最愉快的贴代码时间~
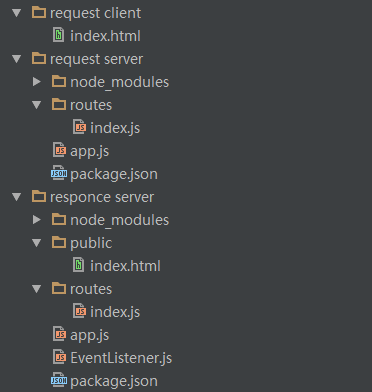
先展示一下目录结构:
1)request client > index.html (客户端A代码)
1 2 3 4 5 6 7 8 9 10 11 12 13 14 15 16 17 18 19 20 21 22 23 24 25 26
| <body> <button id="send">发送请求</button> <script> var send = document.querySelector('#send') send.onclick = function () { polling('http://localhost:8888/longPolling',5000) } function polling(url,timeout) { var xhr = new XMLHttpRequest() xhr.open("get",url) xhr.timeout = timeout; xhr.onreadystatechange = function () { if( xhr.readyState === 4 && xhr.status === 200){ alert('对方选择了·确定·') }else if( xhr.readyState === 4 && xhr.status === 204){ alert('对方选择了·取消·') } } xhr.ontimeout = function () { console.log('Timeout resend '+ new Date()); polling(url,5000) } xhr.send() } </script> </body>
|
一个按钮,绑定了polling函数,传入请求地址与超时时间,超时则重新请求。
2.1)request server > app.js (服务器B代码)
1 2 3 4 5 6 7 8 9 10 11 12 13 14 15
| 'use strict'; const Koa = require('koa'); const app = new Koa(); const router = require('koa-router')(); const cors = require('koa-cors'); const routers = require('./routes'); let repPort = 8888; router.use('/', routers.routes(), routers.allowedMethods()); app.use(cors()); app.use(router.routes(), router.allowedMethods()); app.listen(repPort)
|
2.2)request server > routes > index.js (服务器B路由)
1 2 3 4 5 6 7 8 9 10 11 12 13 14 15 16 17 18 19 20 21
| const router = require('koa-router')() const rp = require('request-promise'); let resHostname = 'localhost'; let resPort = 8889; router.get('longPolling', function* (next){ let options = { uri : `http://${resHostname}:${resPort}/btServer`, method : 'post' }; yield rp(options).then(data=>{ this.status = parseInt(data); console.log('Finished') }).catch(err=>{ console.log(`error message:${err}`) }); }); module.exports = router;
|
接收A发来的请求,使用request-promise向C发送请求,同时挂起处理以等待响应。
3.1)responce server > app.js (服务器C代码)
1 2 3 4 5 6 7 8 9 10 11 12 13 14 15 16 17 18
| const Koa = require('koa'); const app = new Koa(); const render = require('koa-render'); const router = require('koa-router')(); const routes = require('./routes'); const convert = require('koa-convert'); const bodyparser = require('koa-bodyparser')(); let port = 8889; router.use('/', routes.routes()); app.use(convert(bodyparser)); app.use(require('koa-static')(__dirname + '/public')); app.use(render()); app.use(router.routes()); app.listen(port);
|
3.2)responce server > routes > index.js (服务器C路由)
1 2 3 4 5 6 7 8 9 10 11 12 13 14 15 16 17 18 19 20 21 22 23 24 25 26 27 28 29 30 31 32 33 34 35 36
| const router = require('koa-router')() const EL = require('../EventListener'); const el = new EL(); router.post('btServer', function *(next) { let resBody = 0; el.sendEnsureMsg(); yield new Promise((resolve, reject)=> { el.once('receive', ()=> { if (el.status === 'yes') { resBody = 200; } else if (el.status === 'no') { resBody = 204; } resolve(); }); }); this.body = resBody; this.status = 200; }).get('ensure',function* (next) { let self = this; this.set("content-type","text/event-stream"); yield new Promise((resolve, reject)=> { el.once('ensure', ()=> { console.log('Has send'); resolve(); }); }); self.body = 'data: ensure\n\n'; this.status = 200; }).post('sure', function*(next) { el.receiveEnsureMsg(this.request.body.data) this.status = 200; }); module.exports = router;
|
3.3 的代码继承了events模块,封装了两个方法,一个用来触发服务器推送,一个用来响应客户端D返回的数据。
3.2 中订阅事件使用了该事件监听类并使用了once方法,以防止超时重传时重复订阅此事件。
在调试过程中D一直无法接收到C推送的数据,迟迟查不出原因,最后多方百度才发现,原来EventSource的数据必须以“data: something \n\n”的格式传输,我真是了了。
4)responce server > public >index.html (客户端D代码)
1 2 3 4 5 6 7 8 9 10 11 12 13 14 15 16 17 18 19 20 21 22 23 24 25 26 27 28 29 30 31 32 33 34 35 36 37 38 39 40 41 42 43 44
| <body> <div id="container" style="display: none"> <button id="yes">确定</button> <button id="no">取消</button> </div> <script> var yes = document.querySelector("#yes") var no = document.querySelector("#no") var container = document.querySelector("#container") var eventSource = new EventSource('/ensure') eventSource.onmessage = function (e) { if(e.data === 'ensure'){ container.style.display = 'block' eventSource.close() } } eventSource.onerror = function (err) { console.log(`EventSource error:`); console.log(err); } yes.onclick = function () { postMsg('data=yes') } no.onclick = function () { postMsg('data=no') } function postMsg(msg) { var xhr = new XMLHttpRequest() xhr.open('post','/sure') xhr.onreadystatechange = function () { if(xhr.readyState === 4 && xhr.status === 200){ container.style.display = 'none' } } xhr.setRequestHeader("Content-Type", "application/x-www-form-urlencoded"); xhr.send(msg) } </script> </body>
|
客户端D的代码没有独立开来而放在了response server文件夹下是因为EventSource要求与请求的服务器同源,就直接给它放在了静态资源下。
总结:
好了,代码贴完了,其实并没有什么含金量,就是坑特多。
就这样吧,代码放github了。
传送门:https://github.com/WillBean/long-polling.git